Using Triggers
Send payloads to your AI agents or systems based on events in apps
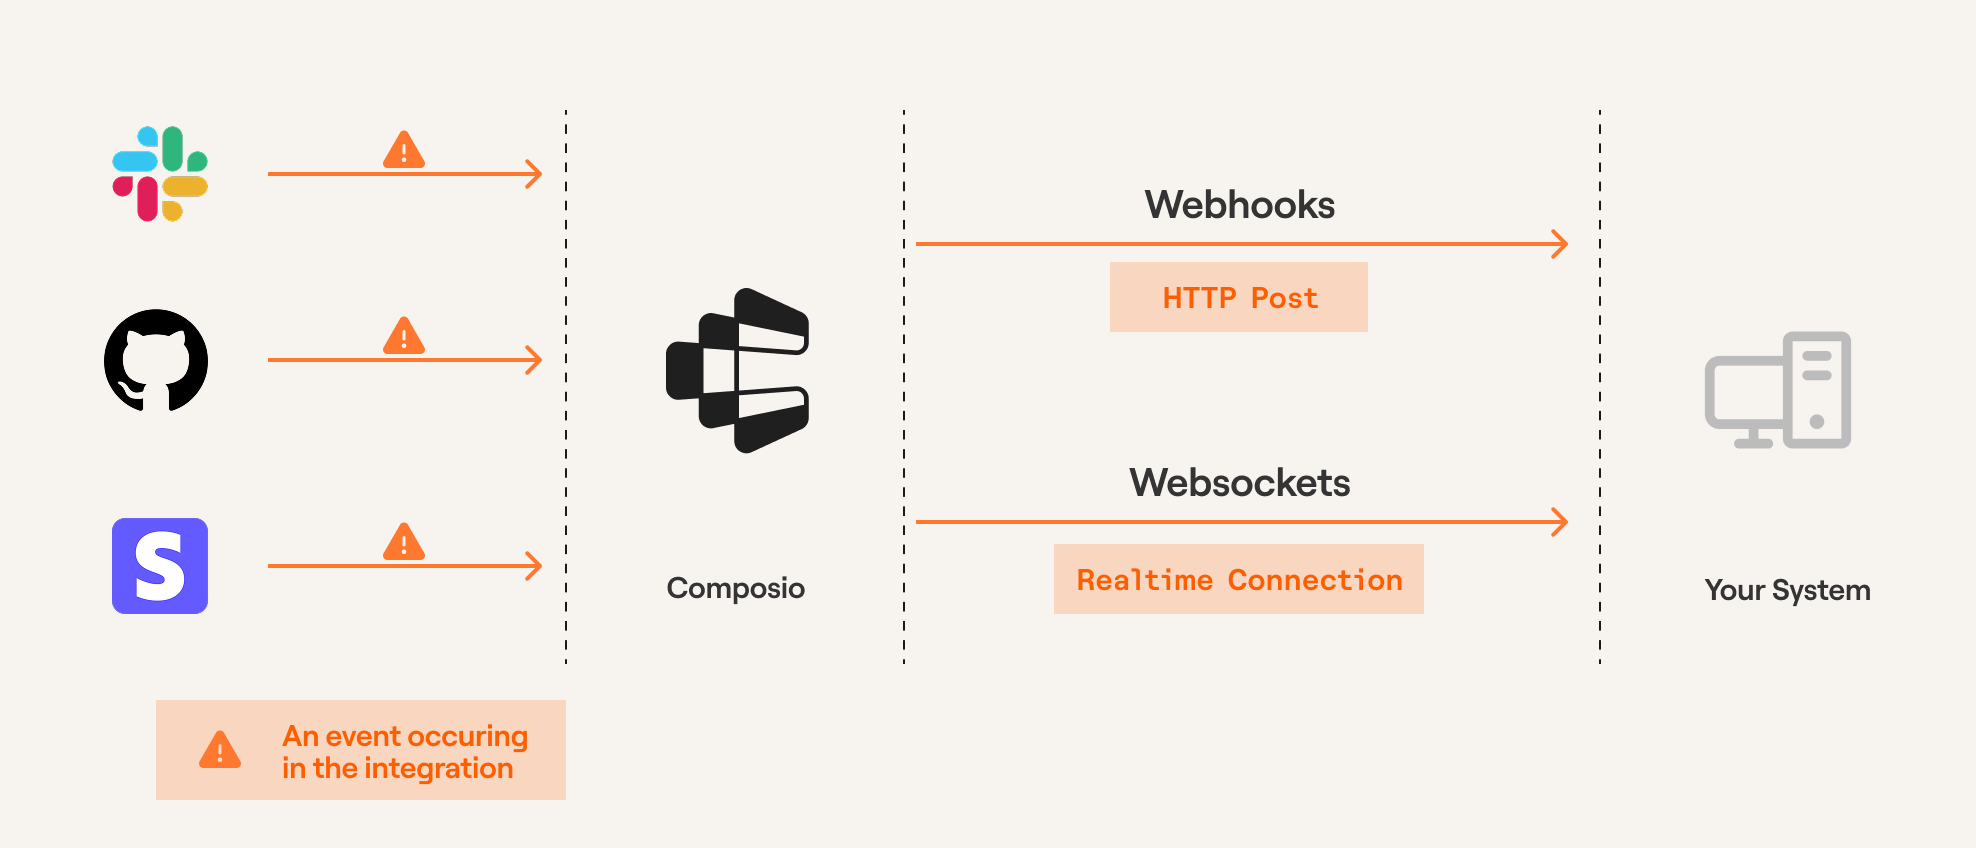
When events occur in connected apps (like new Slack messages or GitHub commits), triggers automatically send the event data to your application.
Each event is delivered as a structured payload to your webhook endpoint (via webhooks or WebSockets), enabling your applications or AI agents to respond proactively.
Prerequisites
Before proceeding, ensure you've created an auth config and established a connection to an app (e.g., Slack, GitHub). Triggers are scoped to specific users - learn about User Management for guidance on structuring User IDs.
Creating a trigger
You can create triggers using either the Composio dashboard or programmatically via the SDK.
Using Dashboard
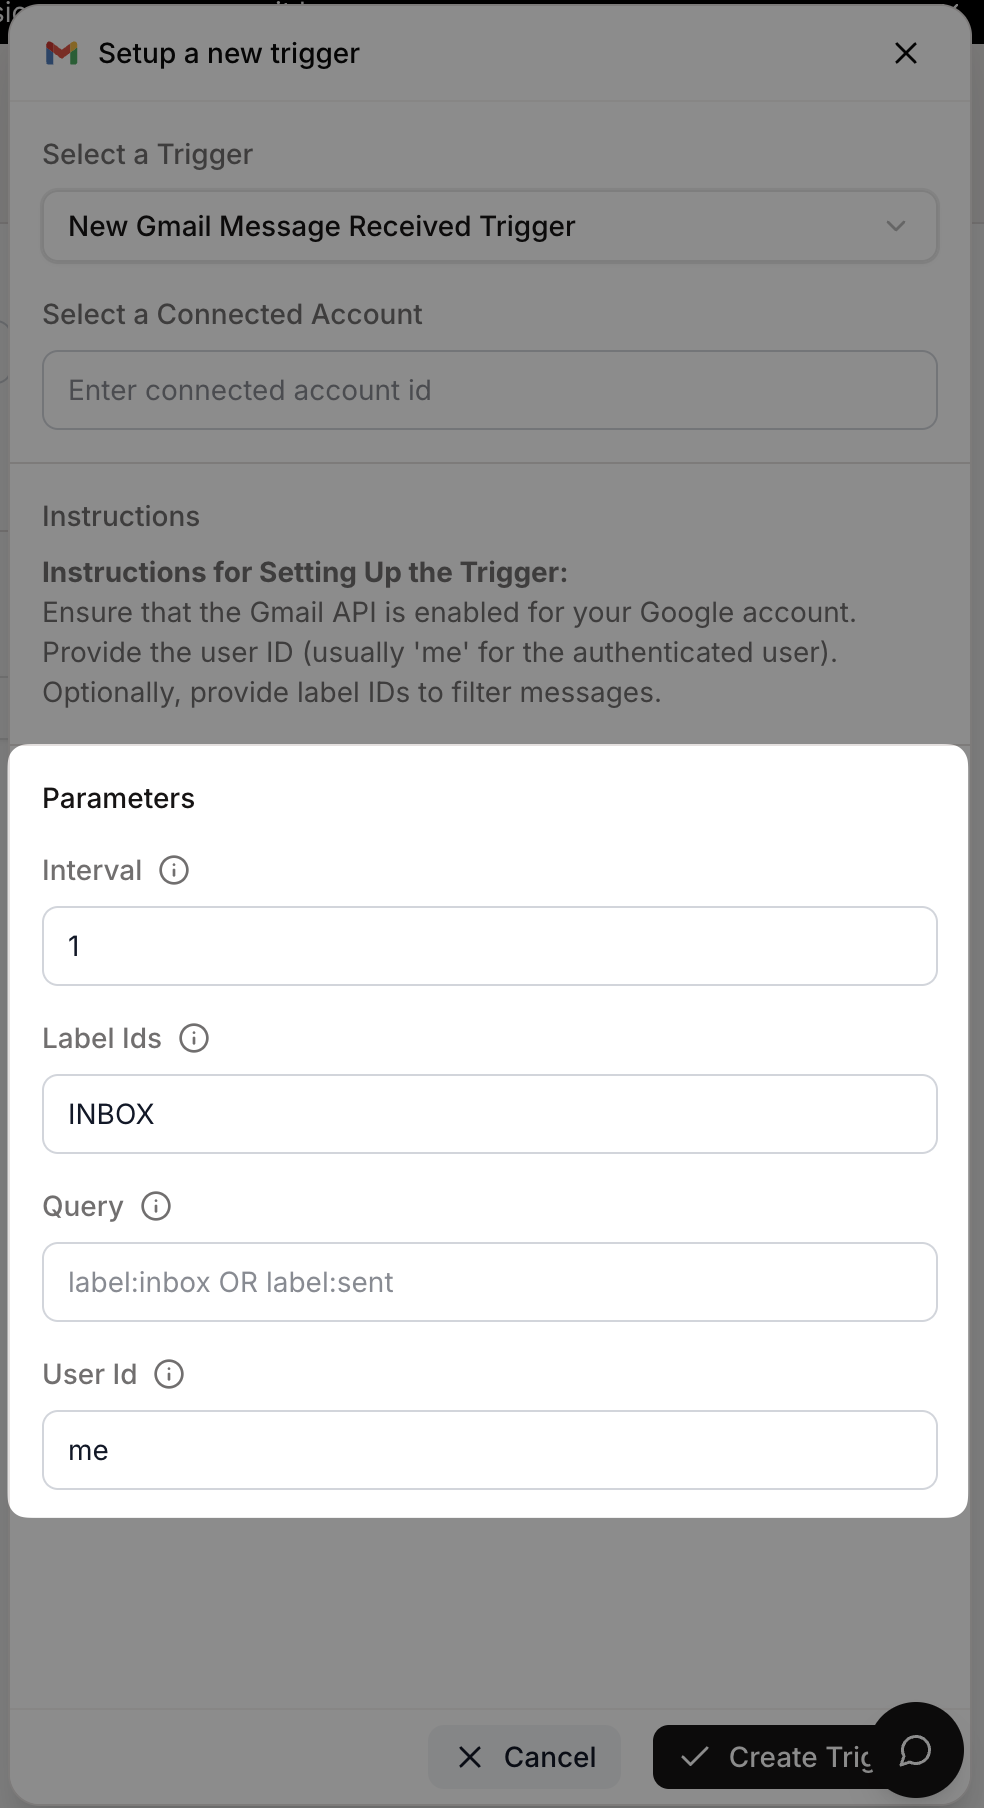
To create triggers through the dashboard:
- Navigate to the Auth Configs page
- Select the auth config
- Click "Add Trigger" and navigate to "Active Triggers" tab to fetch the trigger ID
Some triggers require additional configuration. The dashboard will prompt you for any required fields during setup.
Using SDK
Create triggers programmatically by providing the trigger type and any required configuration. The trigger instance will be created using the toolkit version configured during Composio initialization (defaults to 'latest').
from composio import Composio

composio = Composio(api_key="your-api-key")
user_id = "user-id-123435"

# Check what configuration is required
trigger_type = composio.triggers.get_type("GITHUB_COMMIT_EVENT")
print(trigger_type.config)
# Returns: {"properties": {...}, "required": ["owner", "repo"], ...}

# Create trigger with the required config
trigger = composio.triggers.create(
    slug="GITHUB_COMMIT_EVENT",
    user_id=user_id,
    trigger_config={"owner": "your-repo-owner", "repo": "your-repo-name"},
)
print(f"Trigger created: {trigger.trigger_id}")
import { Composio } from '@composio/core';
const composio = new Composio({apiKey: "your-api-key"});
const userId = 'user-id-123435';
// Check what configuration is required
const triggerType = await composio.triggers.getType("GITHUB_COMMIT_EVENT");
console.log(triggerType.config);
// Returns: {"properties": {...}, "required": ["owner", "repo"], ...}
// Create trigger with the required config
const trigger = await composio.triggers.create(
userId,
'GITHUB_COMMIT_EVENT',
{
triggerConfig: {
owner: 'your-repo-owner',
repo: 'your-repo-name'
}
}
);
console.log(`Trigger created: ${trigger.triggerId}`);To use a specific toolkit version when creating triggers, configure toolkitVersions during initialization. See Toolkit Versioning for more details.
Subscribing to triggers
Webhooks
The recommended way to subscribe to triggers is through webhooks. Configure your webhook URL in the Event & Trigger settings.
Use a publicly accessible URL where Composio can send event payloads. This endpoint should be able to process incoming POST requests containing the trigger data.
Local development: Use ngrok or webhook.site to expose your local server to the internet for testing.
Webhook payloads contain:
type: The trigger type identifierdata: The actual event datatimestamp: When the event occurredlog_id: Unique identifier for this event
Below are examples of webhook handlers for FastAPI and Next.js applications:
@app.post("/webhook")
async def webhook_handler(request: Request):
    payload = await request.json()

    trigger_type = payload.get("type")
    event_data = payload.get("data", {})

    if trigger_type == "github_star_added_event":
        repo_name = event_data.get("repository_name")
        starred_by = event_data.get("starred_by")
        print(f"Repository {repo_name} starred by {starred_by}")
        # Add your business logic here

    return {"status": "success", "message": "Webhook processed"}
export default async function webhookHandler(req: NextApiRequest, res: NextApiResponse) {
const payload = req.body;
if (payload.type === 'github_star_added_event') {
const event: TriggerEvent<GitHubStarEventData> = {
type: payload.type,
timestamp: payload.timestamp,
data: payload.data
};
console.log(`Repository ${event.data.repository_name} starred by ${event.data.starred_by}`);
// Add your business logic here
}
res.status(200).json({
status: 'success',
message: 'Webhook processed'
});
}Verifying webhook signatures
Composio signs all webhook requests so you can verify they're authentic. Each webhook includes these headers:
webhook-signature: HMAC signature in formatv1,<base64_signature>webhook-id: Unique message identifierwebhook-timestamp: Unix timestamp when the webhook was sent
To enable verification:
- Obtain your webhook secret from the Composio dashboard under Project Settings → Webhook
- Set it as the
COMPOSIO_WEBHOOK_SECRETenvironment variable - Use the verification function in your webhook handler:
def verify_webhook_signature(request: Request, body: bytes) -> bool:
    """Verify Composio webhook signature"""
    webhook_signature = request.headers.get("webhook-signature")
    webhook_id = request.headers.get("webhook-id")
    webhook_timestamp = request.headers.get("webhook-timestamp")
    webhook_secret = os.getenv("COMPOSIO_WEBHOOK_SECRET")

    if not all([webhook_signature, webhook_id, webhook_timestamp, webhook_secret]):
        raise HTTPException(status_code=400, detail="Missing required webhook headers or secret")

    if not webhook_signature.startswith("v1,"):
        raise HTTPException(status_code=401, detail="Invalid signature format")

    received = webhook_signature[3:]
    signing_string = f"{webhook_id}.{webhook_timestamp}.{body.decode()}"
    expected = base64.b64encode(
        hmac.new(webhook_secret.encode(), signing_string.encode(), hashlib.sha256).digest()
    ).decode()

    if not hmac.compare_digest(received, expected):
        raise HTTPException(status_code=401, detail="Invalid webhook signature")

    return True
function verifyWebhookSignature(
req: NextApiRequest,
body: string
): boolean {
const signature = req.headers['webhook-signature'] as string | undefined;
const msgId = req.headers['webhook-id'] as string | undefined;
const timestamp = req.headers['webhook-timestamp'] as string | undefined;
const secret = process.env.COMPOSIO_WEBHOOK_SECRET;
if (!signature || !msgId || !timestamp || !secret) {
throw new Error('Missing required webhook headers or secret');
}
if (!signature.startsWith('v1,')) {
throw new Error('Invalid signature format');
}
const received = signature.slice(3);
const signingString = `${msgId}.${timestamp}.${body}`;
const expected = crypto
.createHmac('sha256', secret)
.update(signingString)
.digest('base64');
return crypto.timingSafeEqual(Buffer.from(received), Buffer.from(expected));
}The signature is calculated as:
signing_string = "{webhook-id}.{webhook-timestamp}.{raw_body}"
signature = HMAC-SHA256(signing_string, secret)
Prototyping with trigger subscriptions
During development, you can subscribe to triggers directly through the SDK without setting up webhooks.
You can subscribe to multiple trigger events by configuring the filters. When you specify multiple filters, ALL of them must match for the trigger to be subscribed to.
from composio import Composio

# Initialize Composio client
composio = Composio(api_key="your_api_key_here")

# Subscribe to trigger events
subscription = composio.triggers.subscribe()

# Define event handler
@subscription.handle(trigger_id="your_trigger_id")
def handle_github_commit(data):
    print(f"New commit detected: {data}")
    # Add your custom logic here

# listen for events on the trigger
subscription.wait_forever()
# Note: For production use, set up webhooks instead
import { Composio } from '@composio/core';
// Initialize Composio client
const composio = new Composio({ apiKey: "your_api_key_here" });
// Subscribe to trigger events
composio.triggers.subscribe(
(data) => {
console.log(`New commit detected:`, data);
// Add your custom logic here
},
{ triggerId: 'your_trigger_id' }
);
// Note: For production use, set up webhooks insteadTrigger payload types
To see what data you'll receive in your webhook handler, inspect the trigger's payload:
# Get trigger type to inspect payload structure
trigger = composio.triggers.get_type(slug="GITHUB_COMMIT_EVENT")
print(trigger.payload)
// Get trigger type to inspect payload structure
const triggerType = await composio.triggers.getType('GITHUB_COMMIT_EVENT');
console.log(triggerType.payload);Type-safe trigger handling (TypeScript)
For better type safety and developer experience in TypeScript, you can define specific payload types and use the TriggerEvent<T> interface:
import { Composio, TriggerEvent } from '@composio/core';

// Define type-safe payload for GitHub Star Added event
export type GitHubStarAddedEventPayload = {
  action: "created";
  repository_id: number;
  repository_name: string;
  repository_url: string;
  starred_at: string;
  starred_by: string;
};

// Type-safe trigger event handler
function handleGitHubStarEvent(event: TriggerEvent<GitHubStarAddedEventPayload>) {
  console.log(`⭐ ${event.data.repository_name} starred by ${event.data.starred_by}`);
}
This approach provides:
- IntelliSense support for trigger payload fields
- Compile-time error checking for typos and invalid field access
- Better documentation through TypeScript types
- Improved maintainability of trigger handling code
Managing triggers
Enable/disable triggers
You can pause triggers temporarily without deleting them.
# Disable a trigger
composio.triggers.disable(trigger_id="ti_abcd123")

# Re-enable when needed
composio.triggers.enable(trigger_id="ti_abcd123")
// Disable a trigger
await composio.triggers.disable('ti_abcd123');
// Re-enable when needed
await composio.triggers.enable('ti_abcd123');You can also manage triggers from the dashboard:
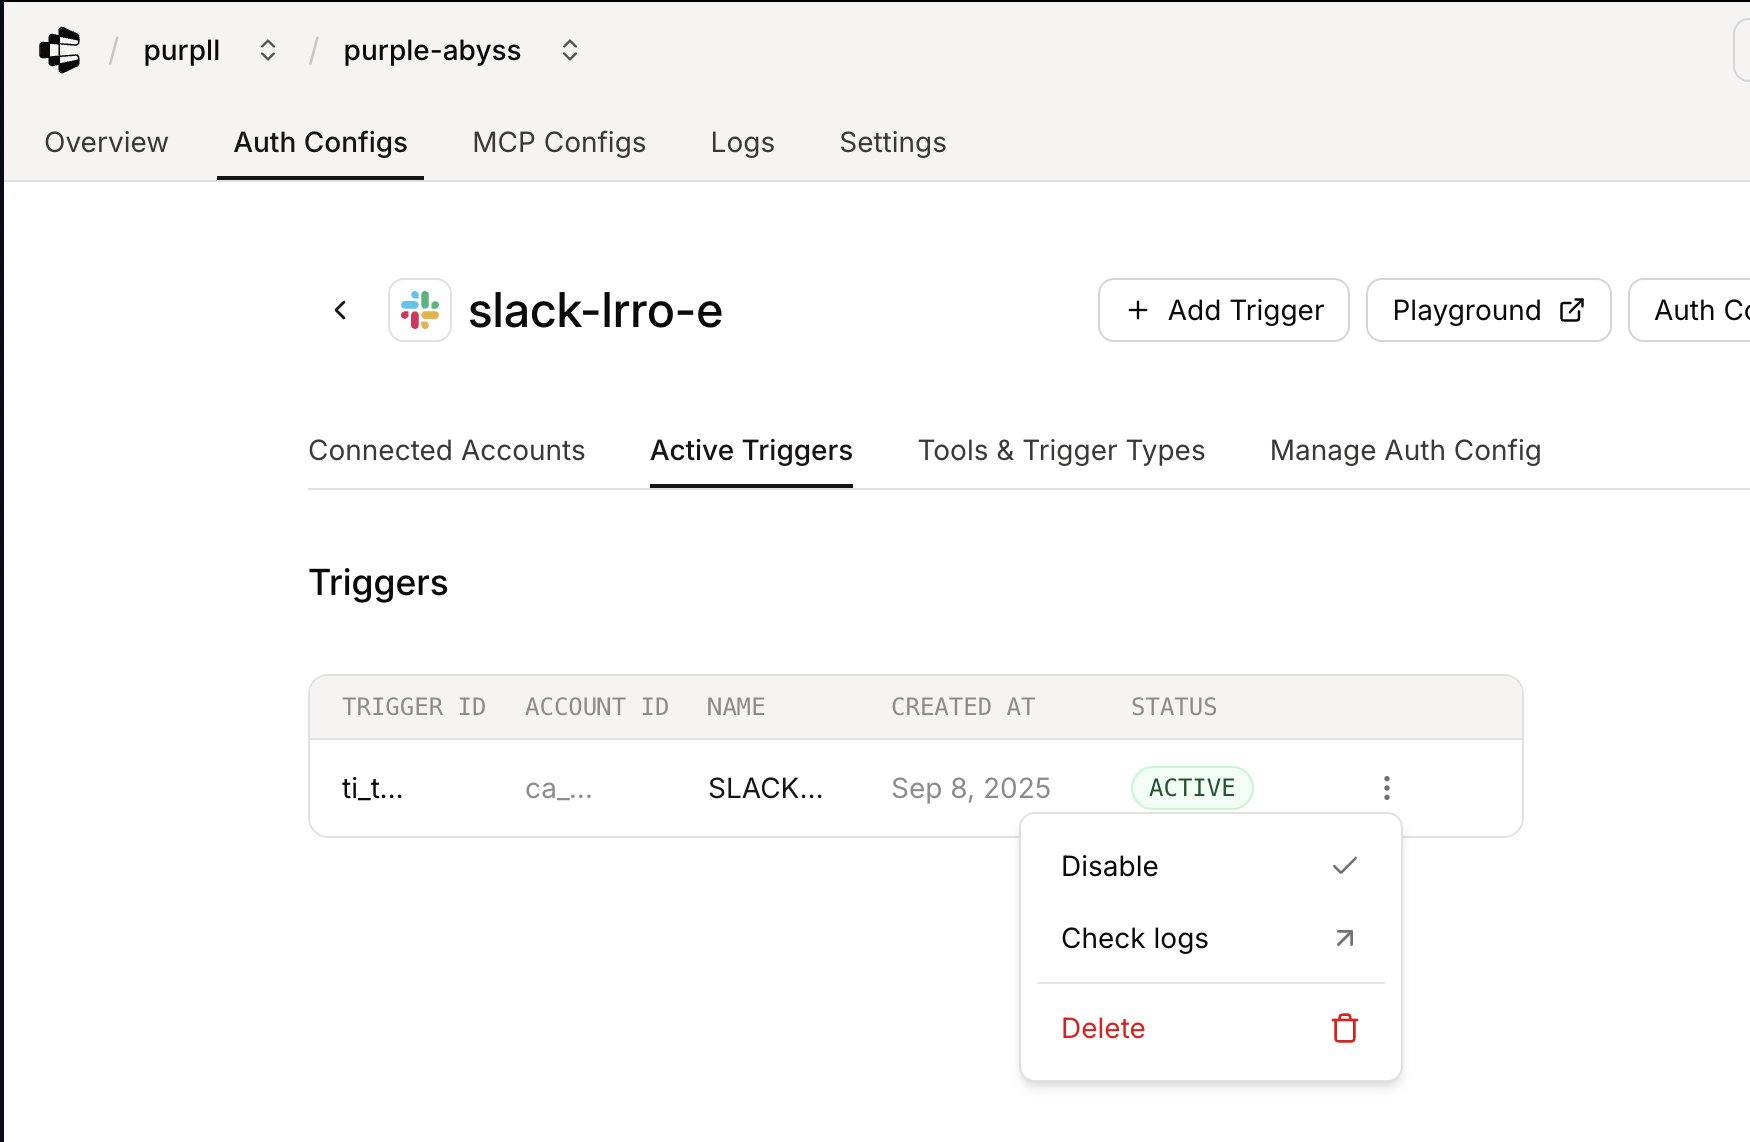
- Go to the Auth Config page
- Select your auth config
- Navigate to "Active Triggers"
- Disable/Enable the trigger
Troubleshooting
View detailed trigger logs and debug issues on the Composio dashboard.